High Availability Pi-Hole Setup using Keepalived
A high availability Pi-Hole setup takes redundancy to the next level, through the use of Gravity Sync and Keepalived.
Gravity-Sync is a tool that can keep multiple Pi-Hole in sync with each other.
Keepalived is a powerful and flexible tool for High Availability setups, through the use of Virtual IP and VRRP.
Virtual IP addresses (VIPs) are shared IP Address that can float between different servers, where if one server fails, another server can automatically take over the VIP, ensuring that clients can still access the service without interruption.
VRRP (Virtual Router Redundancy Protocol) allows multiple routers or servers to work together to present a single virtual IP address to clients. The routers or servers in the VRRP group elect a master to handle traffic, while the others remain in standby mode. If the master fails, another router is automatically promoted to master, ensuring continuous service.
The steps in this guide is inspired by https://davidshomelab.com/pi-hole-failover-with-keepalived/
Prerequisites
- Two instance of Pi-Hole servers already setup and running.
- Gravity-Sync is installed and running on both Pi-hole servers
Install Keepalived
Intsall the Keepalivd packages
sudo apt install keepalived libipset13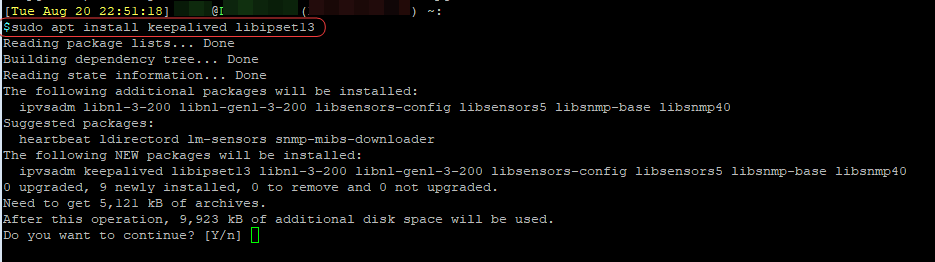
Configuring Keepalived for Pi-Hole
First, we will need to create a script to monitor the Pi-Hole services.
Create a new directory and the script file.
#Create the new directory
sudo mkdir /etc/scripts

#Create a blank script file
sudo touch /etc/scripts/chk_ftl
Edit the script file, and copy the following into the file.
#!/bin/sh

STATUS=$(ps ax | grep -v grep | grep pihole-FTL)

if [ "$STATUS" != "" ]
then
    exit 0
else
    exit 1
fi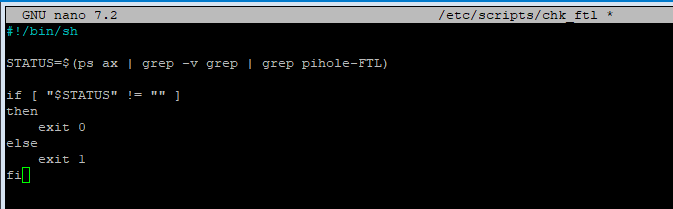
You can also run the following to create the script file with the above content in one go:
sudo tee /etc/scripts/chk_ftl > /dev/null <<EOF
#!/bin/sh

STATUS=$(ps ax | grep -v grep | grep pihole-FTL)

if [ "$STATUS" != "" ]
then
    exit 0
else
    exit 1
fi
EOF
Next, we will need to make the script execuatable.
sudo chmod +x /etc/scripts/chk_ftl
On both Pi-Hole servers, create the blank keepalived config file
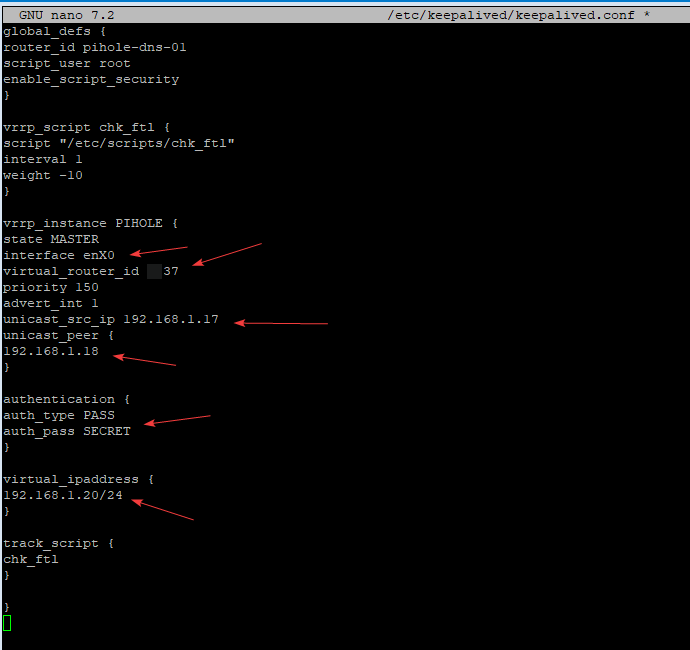
sudo touch /etc/keepalived/keepalived.confCopy the following onto the FIRST Pi-Hole server, the primary one, and modify it according to your server's configuration:
global_defs {
router_id pihole-dns-01 #You can name this anything you want
script_user root
enable_script_security
}

vrrp_script chk_ftl {
script "/etc/scripts/chk_ftl"
interval 1
weight -10
}

vrrp_instance PIHOLE {
state MASTER #The primary Pi-Hole server is set to MASTER
interface eth0 #This will be your Pi-Hole server's interface name
virtual_router_id 69 #Pick any number from 1 to 255 to use as the VHID, that is not in use on your network
priority 150
advert_int 1
unicast_src_ip 192.168.1.17 #IP of this primary Pi-Hole
unicast_peer {
192.168.1.18 #IP of the secondary Pi-Hole
}

authentication {
auth_type PASS
auth_pass SECRET08 #Set a secure password. Max 8 characters.
}

virtual_ipaddress {
192.168.1.20/24 #This is the shared Virtual IP address. Pick an unused IP address on your network.
}

track_script {
chk_ftl
}

}
Copy the following onto the SECOND Pi-Hole server, the secondary one, and modify it according to your server's configuration:
global_defs {
router_id pihole-dns-02 #This can be any name you want
script_user root
enable_script_security
}

vrrp_script chk_ftl {
script "/etc/scripts/chk_ftl"
interval 1
weight -10
}

vrrp_instance PIHOLE {
state BACKUP #The secondary Pi-Hole is set as BACKUP
interface eth0 #This is the interface name of the second Pi-Hole server
virtual_router_id 69 #The VHID must match with the primary server.
priority 145 #This is set to a lower piority since its the secondary server
advert_int 1
unicast_src_ip 192.168.1.18 #IP of this secondary Pi-Hole server
unicast_peer {
192.168.1.17 #IP of the primary Pi-Hole server
}

authentication {
auth_type PASS
auth_pass SECRET08 #Password needs to match
}

virtual_ipaddress {
192.168.1.20/24 #The shared VIP
}

track_script {
chk_ftl
}

}
If you don't know your Pi-Hole server's interface name, you can run the following to find out:
ip link
Restart the keepalived service, and check that it is running.
#Restart the service
sudo systemctl restart keepalived.service

#Check the status
sudo systemctl status keepalived.service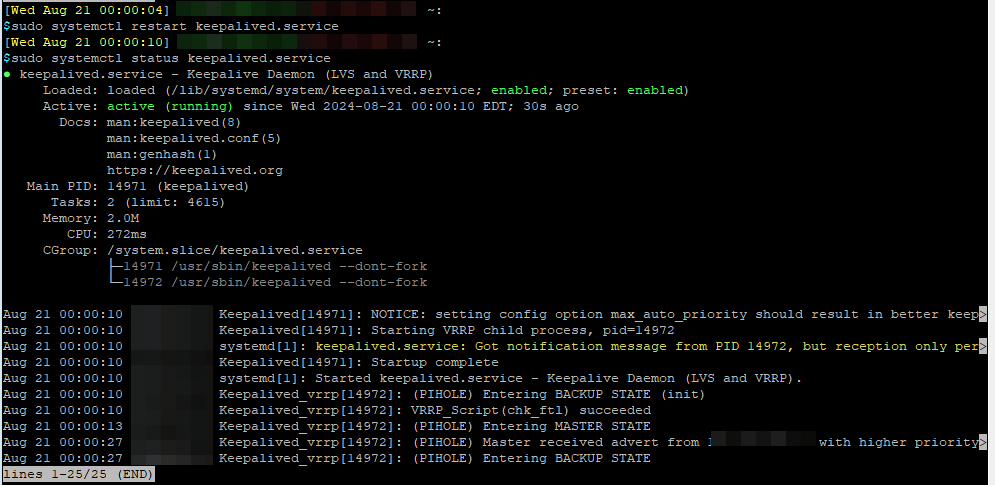
#Enable the service to auto start on boot
sudo systemctl enable keepalived.service
You should now be able to navigate to the shared Virtual IP address and be able to access the Pi-Hole admin console.
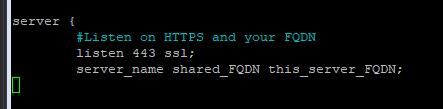
If you are using NGINX as the webserver with custom domain name, you will need to modify the NGINX config to add the shared FQDN.
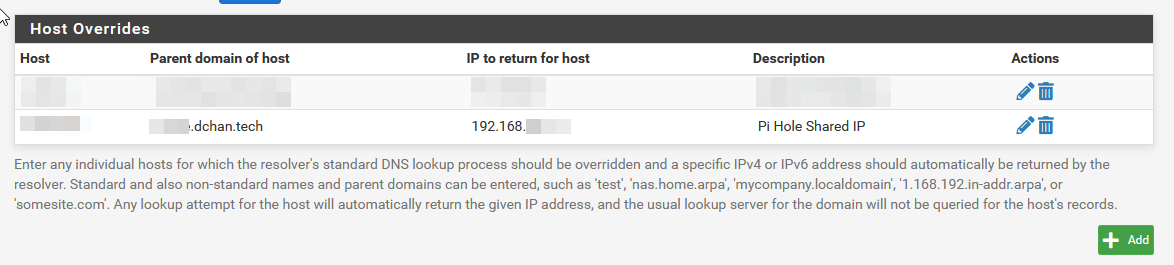
If you are using a domain name to access Pi-Hole's webGUI through pfSense, you'll want to add an host override in your pfSense so that the domain name resolves to the shared, virtual IP address.